We use cookies to provide you with a better experience. By continuing to use this site, you agree to our use of cookies.

Removing Cavity Wall Insulation Before the 2030 Deadline: What Landlords Need to Know

Removing cavity wall insulation is not the first thing most landlords expect to be thinking about in the context of the 2030 EPC C deadline. The instinct is to add insulation, not take it out. But for a significant number of rental properties across the UK, the cavity insulation that was installed under previous grant schemes is performing poorly, causing damp, or is simply unsuitable for the wall construction it was injected into. For these properties, removing cavity wall insulation is not a setback. It is the necessary first step before the correct upgrade can be installed and before the property can genuinely improve its EPC rating.

The scale of the issue is more significant than is often acknowledged. Cavity wall insulation was delivered at scale under ECO and predecessor schemes throughout the 2000s and 2010s, and in many cases properties were assessed as suitable when they were not. Exposed elevations, partial fill cavities, walls with existing damp issues, and non-standard constructions were all sometimes treated with standard blown insulation. The consequences in many of those cases have been persistent damp, internal mould, and a wall that performs worse thermally than it did before because the insulation is wet, compacted, or bridging the cavity incorrectly.

Signs That Cavity Insulation May Need to Be Removed

Landlords with rental properties should be alert to the following indicators that existing cavity insulation is failing. Persistent damp patches on internal walls, particularly on north facing or exposed elevations, that appeared or worsened after insulation was installed. Mould growth on internal wall surfaces in rooms that were previously dry. Tenants reporting cold spots on walls despite the property having cavity insulation. A deteriorating EPC rating despite insulation being present, which can happen when wet insulation performs significantly below its rated thermal value.

Any of these symptoms warrants a professional inspection rather than a cosmetic fix. A specialist cavity wall insulation surveyor can carry out a borescope investigation, drilling a small access hole and inserting a camera to assess the condition of the fill. This inspection will reveal whether the insulation is intact, partial, wet, slumped, or bridging the cavity in a way that is causing moisture transfer. The inspection report provides the basis for deciding whether removal and reinstatement is necessary.

Removal is also sometimes required for structural reasons. Some cavity wall insulation materials, particularly certain early polyurethane foam installations, have been associated with corrosion of wall ties and structural concerns. Mortgage lenders and surveyors increasingly flag these installations, and for landlords looking to refinance or sell properties in their portfolio, the presence of problematic foam cavity fill can be a significant obstacle.

How Cavity Wall Insulation Removal Works

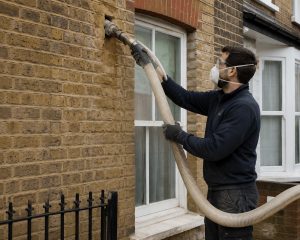
Removing cavity wall insulation is a specialist process carried out by registered contractors. The most common approach for blown fibre or bead fill involves drilling a pattern of extraction holes through the outer leaf of the wall, inserting a vacuum extraction hose, and drawing the insulation material out under negative pressure. The holes are then filled and pointed to match the existing brickwork as closely as possible.

For polyurethane foam, removal is considerably more complex. Foam bonds to the wall surfaces and cannot be extracted in the same way as loose fill. Removal typically requires mechanical extraction through larger access holes and is more expensive and time consuming. In some cases a full removal is not achievable and the options are limited to removal of as much material as possible combined with specialist remediation of the affected areas.

The cost of removal varies significantly depending on property size, material type, and the extent of the contamination. For a standard semi-detached house with blown fibre or bead fill, costs typically range from £1,500 to £4,000. Foam removal is typically higher, often between £3,000 and £8,000 or more for complex installations.

What Comes After Removing Cavity Wall Insulation

Once defective insulation has been removed, the cavity needs to be left open for a period to dry out before any new insulation is installed. A post-removal inspection confirms that the cavity is clear, dry, and in suitable condition for reinstatement. At that point, the property can be re-insulated with an appropriate material, correctly specified for the wall construction and exposure level.

This is also the point at which EPC improvement becomes possible. A property with failed cavity insulation that is damp or thermally ineffective will not benefit from the insulation on paper because the EPC assessor will note its presence, but the actual thermal performance will be poor. After removal and correct reinstatement, the EPC assessment reflects the real performance of the wall and the rating improves accordingly.

For landlords facing the 2030 EPC C deadline, removing cavity wall insulation that is failing is therefore not a delay to compliance. It is the route to compliance. A property with defective insulation that stays below EPC C is a non-compliant property from October 2030. A property that is correctly remediated and re-insulated is one that stands a genuine chance of reaching the required rating, accessing any available grant funding for the reinstatement, and remaining legally lettable.

The practical advice is to carry out a borescope survey on any rental property where you have any doubt about the condition of existing cavity fill. The cost of the survey is modest. The cost of leaving defective insulation in place, and discovering the full extent of the problem in 2029, is considerably higher.
emoving cavity wall insulation from UK rental property before EPC C deadline 2030Ask us a question!

Wall Insulation Case Studies: Real homes, real results

Wall insulation is one of those upgrades you often do once and then benefit from every day. It can cut heat loss through walls, reduce condensation, improve comfort, and even make a home quieter. The case studies below share how different households approached wall insulation and what changed for them afterwards.

Case Study 1: Selali and Kojo, semi-detached home in Manchester

Selali and Kojo live in a 1930s semi-detached house where the front rooms have always felt noticeably colder than the rest of the home since they moved in. On winter evenings, the heating would run for hours, yet the living room never quite reached a comfortable temperature, and the external walls felt chilly to the touch.

Case studies wall insulation

After learning that uninsulated cavity walls can account for a large amount of heat loss, they booked an installer to add cavity wall insulation. The work took less than half a day, involving small drill holes in the mortar joints and the injection of insulation into the cavity. There was very little mess, and they stayed at home throughout the process.

Within a week, they noticed a real difference. The house warmed up more quickly in the mornings and stayed warm for longer once the heating was switched off. Their boiler ran far less often, and the persistent cold spots in the front rooms disappeared. By the end of the winter, their energy bills were noticeably lower than the year before, despite keeping the thermostat at the same settings.

Another welcome improvement was the quieter front rooms. The insulation helped soften noise from the nearby main road, which made evenings feel calmer. Selali says, “We just wish we had done it sooner. The house feels warmer, we use the heating less, and the front room is so much more comfortable.”

Case Study 2: Susiban and Liz, flat conversion in London

Susiban and Liz live in a first-floor flat within a converted period house. While the external walls were reasonably insulated, the party wall and some internal partitions were thin, offering minimal sound reduction and heat retention. They could hear everyday noises from the neighbouring flat, and heat from their living room escaped easily into the uninsulated hallway and stairwell.

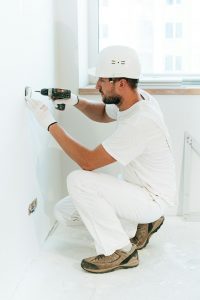
During planned redecorating work, they decided to add mineral wool insulation to key stud walls, including the party wall and the wall between the living room and the unheated stairwell. The plasterboard was removed, insulation was fitted between the studs, and new sound-rated plasterboard was installed. Each room took only a few days, and the work fitted neatly into their existing renovation plans.

Afterwards, normal household noise from next door was much less noticeable, and the living room felt more private and peaceful. They also found that the room stayed warmer in the evenings because less heat was being lost into unheated parts of the building. The flat now feels more like a self-contained home rather than part of a noisy conversion. Liz says, “We had not realised how much difference insulating internal walls could make. It is quieter, warmer and just a nicer space to relax in.”

Case Study 3: The O’Neills, detached house in Edinburgh

The O’Neills live in a 1950s detached home on an exposed hilltop, where strong winds and driving rain are common in winter. Even with modern double glazing and good loft insulation, the house was difficult to keep warm and several external walls developed recurring condensation near window reveals.

They decided that external wall insulation would offer the most complete solution. Installers fixed insulation boards to the outside walls, added reinforcing mesh, and finished the surface with a new coloured render. The work took a couple of weeks with scaffolding in place, but the family stayed in the house throughout.

Once finished, the difference was immediate. Rooms that used to feel cold on windy days became noticeably cosier, and the heating did not need to run for as long to maintain a comfortable temperature. The recurring condensation stopped, and the overall humidity indoors was easier to control.

The fresh render also improved the house’s overall appearance, making it feel more modern and well-kept. Mrs O’Neill says, “The house finally feels how it should. No more cold draughts and no more wiping down condensation every morning. It looks better from the outside, too, which was a nice bonus.”

Case Study 4: Martin, Victorian terrace in Hertfordshire

Case Studies Wall Insulation

Martin owns a Victorian terrace with solid brick walls that always felt cold in winter, especially the external living room wall. It was often cold to the touch, and on cool nights, condensation would build up behind the sofa, raising concerns about damp and mould.

Because solid walls have no cavity to fill, he opted for internal wall insulation using insulated plasterboard. This brought the wall slightly inwards, but the installer planned the layout carefully so that sockets and skirting boards could be repositioned without making the room feel smaller. The work was done one room at a time to keep disruption to a minimum.

After the upgrade, the external walls no longer felt cold, and the room’s temperature stayed far more consistent. The house held heat for longer once the radiators turned off, rather than cooling rapidly. The condensation patches behind furniture disappeared, reassuring Martin that the walls were now able to stay dry.

He was also pleased to see an improvement in his EPC rating, something he knows will help if he decides to sell or rent the property. “It has made a real difference to how the house feels,” he explains. “I used to keep the heating on for ages. Now I turn it off, and the place stays warm.”

Thinking about insulating your own walls?

If you are unsure which type of wall insulation suits your property or you have questions about costs, suitability or finding an installer, we are here to help.

You can ask us anything at: https://wallinsulation.co.uk/ask-a-question/.